
Tag: User Stories

What Apple’s Vision Pro Tells Us about User Stories

The Verge released a story recently reporting how early buyers of Apple’s Vision Pro “spatial reality” headset were already returning their devices to take advantage of Apple’s 14-day return policy window.

But why?

In this article, I’ll recap the issues sprouting up around this nonetheless revolutionary product in order to make a couple of arguments: 1) How Apple’s approach to hardware development may (to a fault) prioritize perceived quality over functional requirements, and 2) What user stories for a hardware/software product may necessitate to make future generations more viable for widespread adoption.


Problems Abound in VR, but Did Apple Put Form before Function?

The key issues cited for returns of the Apple Vision Pro are usability issues coupled with a hefty price tag (i.e., $3,500 MSRP).

That’s not to say buyers aren’t blown away by the revolutionary UI and what the device is capable of. Rather, users’ concerns are that—relative to the high price tag and usability issues—they simply can’t justify the expense for a device that presents these usability concerns. The price isn’t worth the experience, in other words.

Consider some of the tweets on X (formerly Twitter) from users describing their experiences with the device and ultimately their reasons for returning their headsets to Apple:

“Can’t wait to return the Vision Pro, probably the most mind blowing piece of tech I’ve ever tried. Can’t deal with these headaches after 10 minutes of use though,” tweets one user.

“Two hours after unboxing my Apple Vision Pro and using it, I decided to box it back up again and return it. It’s quite cool, but there’s nothing in it for me that I’ll use frequently enough to warrant my keeping it,” tweets another.

Virtual reality headsets are a complicated product category and represent an exceedingly difficult problem to solve considering the technical and physical challenges. I’ve reported on how, for example, ergonomics are a known issue.

Consider the problems a VR headset must address:

  • Weight – Obviously, a perfect solution doesn’t yet exist, but as some reviewers have reported, Meta’s redistribution of weight and use of pancake lenses in place of Fresnel lenses in their Meta Quest Pro represent an attempt to resolve UX problems their earlier Quest 2 presented. Considering that VR headsets aren’t a new category, reviewers may have liked to see a better first showing from Apple regarding the ergonomics issues related to weight distribution.
  • Price – With the $3,500 price tag (compared to $999.99 for Meta’s Quest Pro), price is an issue. Certainly, higher grade materials which play important parts of Apple’s industrial design philosophy and sustainability goals contribute to the heavier form factor compared to other headsets that rely on plastics. That said, alternative materials such as recycled plastics represent another way to reduce costs (e.g., potentially by 25-50%) while simultaneously addressing the weight issue.


User Stories and Understanding Evolving Needs

If you’ve seen the 2023 film, Blackberry, about how the once-dominant smartphone predating the iPhone (and later competitive offerings from Samsung), you know that the one thing the titular product from Research in Motion (the company that invented the product category) is that getting there first doesn’t mean staying there indefinitely.

The case of Blockbuster versus Netflix tells a similar story, where a giant who’s become the dominant force in the marketplace is complacent, slow to innovate (due to their complacency), and is disrupted.

In the case of Apple, they weren’t there first in the VR category. They also weren’t the first to the smartphone category, but in the case of the smartphone, they completely redefined the category.

Have they innovated enough while addressing known user problems in the category?

Certainly, Apple has created a revolutionary product, but as Mark Zuckerberg points out, the device doesn’t provide an experience so leaps and bounds ahead of its competitors that it warrants the price and the persistent UX problems.

In short: The Apple Vision Pro isn’t to the AR/VR product category what the iPhone was to the smartphone category.


Advertisement


What User Stories May Have Detailed: Ergonomics at the Center of Industrial Design to Solve Known User Problems

Chief among the user problems with the Apple Vision Pro is the ergonomics problem.

Considering the Verge report of customers returning their Vision Pro headsets with complaints of discomfort relative to the weightiness of the device for extended periods, it’s safe to say Apple hasn’t cracked the ergonomics problem on their first try.

But it’s also safe to say it’s a problem no manufacturer has truly solved, but Apple’s form factor doesn’t help. Consider, for example, how weight has been a known problem in VR applications studied by scholars.

Future iterations of these devices should seek to address the known ergonomics problems users are experiencing.


Example of Ergonomics-First Industrial Design

To stray away from VR headsets for a moment to talk just to ergonomics and how to approach solving real-world ergonomics problems, let me offer an example.

Heavy-duty power tools provide one real-world application where ergonomics are of heightened concern—we’re dealing with workers’ livelihoods and safety in situations that are inherently dangerous, after all. Characteristics of ergonomic power tools typically look to address a combination of weight, shape, and grip to provide a form factor that is as-comfortable-as-possible relative to the application.

Consider some of the common causes of musculoskeletal disorders like trigger finger (e.g., overexertion and repetitive motion) from a person’s finger becoming locked in a bent position as the result of repeatedly gripping and pulling the trigger of a crimper, for example.

Equipped with this known issue, the M18™ FORCE LOGIC™ 12 Ton Utility Crimper introduced a high-capacity muscle testing system to design the tool to require less than eight pounds of trigger release, which is 75% less than other crimpers, while also delivering an improved center of gravity and a significant weight reduction to the tool. What’s more, it requires 47% less muscle effort to use.

The example from Meta’s Quest Pro of redistributing the batteries to address the balance issue in earlier iterations is one that shows promise and Apple may take notice when addressing their own device’s weight problems.


Bottom Line

We may not have cracked the ergonomics problem associated with VR applications, but Apple may look at existing heavy hitters in the category, like Meta, as they tweak their own device’s shortfalls.

Outside of consumer applications, AR and VR offer exciting prospects for productivity enhancements in industries that could stand to gain in productivity like AEC: Studies have looked at the use of VR in safety training (e.g., articles have been published in Applied Sciences, additional research has been produced by California Polytechnic State University, and conference talks have been given on the subject).

If Apple can address the ergonomics and cost issues by prioritizing user needs, their Vision Pro headset may be the construction wearable of choice companies use to onboard new employees, train apprentices, and conduct safety demonstrations in the application to provide greater educational outcomes for the next generation of construction professionals.

Deep Dive Models in Agile Pt 2: Feature Trees

This short paper series, “Deep Dive Models in Agile,” provides valuable information for the Product Owner community to use additional good practices in their projects.

In each paper in this series, we take one of the most commonly used visual models in agile and explain how to create one and how to use one to help build, groom, or elaborate your agile backlog.

Next up in this series is the Feature Tree. If you missed the first edition on Process Flows, you can find that here. Other editions in this series will include: Business Data Diagrams, State Tables/State Diagrams, Decision Trees/Decision Tables and Business Objectives Models.

What is a Feature Tree?

A Feature Tree is an RML Objectives model that shows the full scope of features for a project or product on a single page in a tree format. A feature is just a short form description of the functionality provided by the project or product that brings value to the end user. The Feature Tree is great for bringing new people on a project up to speed and showing executives, business stakeholders, or customers all the features that are in scope for a project or release.

The Feature Tree is similar in shape to a fishbone diagram or an Ishikawa diagram but shows levels of features instead of root-cause analysis. It is easier to read than a flat list of features for a product because the Feature Tree groups them into logical buckets, but Feature Trees are very similar in function to Story Maps or Affinity Diagram which are also other ways to organize features visually for consumption. See an example Feature Tree below.

featuretree1

When would I use a Feature Tree on an agile project?

Feature Trees are useful for almost any agile project because they are just a good way to organize information about the project. The Product Owner (PO) or Business Analyst (BA) will usually elicit the start of a Feature Tree during a sprint 0 or planning type phase, possibly with information from a project charter or light-weight business case. From there, the PO or BA will organize the features into groupings, understand the connections between L1, L2, and L3 features and identify if there are any missing features. Depending on the story hierarchy you are using on your project, you might use Program Epic -> Feature -> Story or just Feature -> Epic -> Story for your L1, L2, and L3 features with the story level being optional (see illustration below).

featuretree2

Since you won’t always know the full scope of the product during sprint 0 or planning, the Feature Tree is always evolving, even throughout development, as the PO or BA finds new features to add to the backlog.

The Feature Tree also helps organize the hierarchy of your backlog as you know have an easy visual of how things are related.

Some ways Feature Trees are modeled to be especially useful on agile projects:

  • Color coding: the PO or BA can color code the features by release or sprint/iteration, which makes it easy to see at a glance if certain features are in or out of scope for a release
  • Prioritization by location: the PO or BA can order the Feature Tree such that more important items are closer to the “trunk” of the tree, allowing for visualization of the backlog prioritization
  • Gap Analysis or Current/Future State: instead of color coding by release, the PO or BA can color code for gaps or current vs. future state of the system (with red, blue, green or little-colored circles we like to call skittles)

How do I create a Feature Tree?

Like Process Flows, Feature Trees are one of the easier RML models to elicit and create. First, the PO or BA should find out if there are any existing lists of features for the project or product from a vision and scope document or a project charter.

From there, the PO or BA would host a brainstorming session to identify potential features and maybe even group them in an affinity diagram or story map. After that, the PO or BA would need to decide the format for their features. This paper is about the Feature Tree as a convenient way to organize the information, but a two level story map or affinity diagram will convey a lot of the same information (just perhaps not tie back to the backlog as well depending on the structure).

The model itself once the PO or BA has decided upon that format is pretty straight forward with only 2 elements:

Trunk/Product Concept– On the trunk of the Feature Tree is the Product Concept; this is a short form phrase that says what the product or project is. This will come from the Business Objectives Model which will be discussed in the next edition of Deep Dive.

Branches/ Feature- Coming out from the trunk are branches which have levels just like real tree branches. The largest branch type is the L1 features. Like the product concept, the L1 features will be described at a high level from the Business Objectives Model. These L1 features will be further broken down into L2 and L3 features (smaller branches) depending on your story hierarchy.

How do I derive user stories out of a Feature Tree?

Once the PO or BA has a good starting draft of the Feature Tree, the epics or features (again depending on your hierarchy) almost fall out of the Feature Tree. Each L2 or L3 branch becomes a feature, epic or story and each L1 branch becomes a Program Epic or Feature (based on SAFe or generic agile hierarchies). See example Feature Tree below:

featuretree3

So a feature for “Create Station” below might become the following epics/ features in your backlog:

featuretree4

Additionally, as mentioned above, you can add color coding to denote releases or sprints like below:

featuretree5

Conclusion

Feature Trees, like Process Flows, are super easy RML models to use on agile projects and derive features, epics, and user stories from because they organize the scope of a project or product onto a single page.

Executives, business stakeholders, and customer love this visual model because it shows them what is in and out of scope easily and potentially even shows them when they will get certain features. Developers and testers like the Feature Tree because it gives them the big picture of the entire project while they are working on specific user stories. Finally, the POs and BAs find this model useful for backlog population early in the project and maintenance throughout, so it is one of the most commonly used RML models on agile projects (second only to Process Flows!)

One note of caution is that because it is so easy to add additional features and scope to the Feature Tree and thus to the backlog, the PO or BA has to be vigilant in the management of the backlog to ensure that only the most valuable features get built for his/her project.

Deep Dive Models in Agile: Process Flows Pt 1

This short paper series, “DeepDive Models in Agile,” provides valuable information for the Product Owner community to use additional good practices in their projects.

In each paper in this series, we take one of the most commonly used visual models in agile and explain how to create one and how to use one to help build, groom, or elaborate your agile backlog.

The first in this series is the Process Flow. Other editions in this series will include: Business Data Diagrams, State Tables/State Diagrams, Decision Trees/Decision Tables, Business Objectives Models, and Feature Trees.

What is a Process Flow?

A Process Flow is an RML People model that describes the steps that a user takes to accomplish a goal or finish a task. This model is great for understanding the project’s current and future state processes of the business and understand those processes from the end user’s point of view.
RML Process Flows are created in levels in order to both be able to see the big picture of a process within a system as well as drill down into the details of a single more detailed process. This is in contrast to huge process maps with over 100 steps that try to show it all – but are unreadable! At the highest level, generally called the L1 level, the entire end to end process for an end user in a system is described, usually in 7-10 steps. This level tends to have no swim lanes or decisions to be made, so it is very abstract. See the top row in the example below:

processflow1

From there, each step in the L1 process is broken down into the lower level processes, called L2 and L3 Process Flows. These are the levels that most people are comfortable talking about and eliciting. Each L2 or L3 process should be no more than 20 elements to keep readability, and even then should be divided by swim lanes to create smaller groups within the diagrams. L3 Process Flows are usually optional and are used if the process is large or complex of if there is a need to elicit that lower level of information to create requirements. See the example of an L2 and L3 Process Flow above.

When would I use a Process Flow on an agile project?

Process Flows are usually used for user-facing projects/systems, although their cousin, the System Flow, can be used in virtually the same manner to document system processes and logic.

When on an agile project, the Product Owner (PO) or Business Analyst (BA) will usually elicit the high-level process flow (L1) in a sprint 0 or planning type phase. From there, during that same planning type phase, the L2 processes to be created will be prioritized, and the PO or BA will usually work on the 1-2 highest priority process flows at the L2 level. This is to build the initial backlog.

Once in the developing phase or in the sprints themselves, the PO or BA will look ahead (usually 1-2 sprints ahead) and determine if additional L2 or L3 Process Flows need to be built to either identify new stories for upcoming sprints or elaborate (via L3 processes) those stories already identified.
This can continue until the project ends. Additionally, the PO or BA, when doing their planning for upcoming sprints, may need to update existing L2 or L3 Process Flows with new information that has come to light. In this case, that time should be built in as part of elaborating the stories, and a common set of Process Flows should be kept so that they are up to date!

How do I create a Process Flow?

Process Flows are one of the easier RML models to elicit and create. To elicit the information, the BA or PO should discuss with the users and stakeholder the processes in the system today, who performs them, and when. Users tend to naturally think about the steps they take every day so this is usually a pretty easy model to elicit.

During elicitation sessions, you can bring draft or strawman models, to generate commentary and ideas. You can also start from scratch with a whiteboard, post-it notes, and the users to create the process.

For future state, the PO or BA will generally start with the current state process flows and elicit information from the users/stakeholders on what will change or be different in the future system.

The Process Flow model itself for RML has roughly 7 element types, of which, we’ll only cover 4 or so today. The elements we are not covering here are forks, joins, and events. All of the elements are connected together by lines with arrows that show the direction of the flow.

Step – The step is the most used element, as it contains all the process steps. This is typically a rectangle with short phrases in the form of subject-action-noun phrase (User logs in). These sentences should be kept short to get the point of the step across without understanding every nuance.

Decision – This element is typically shown as a diamond and describes a decision the user must make to move forward in the process. Decisions are most commonly binary (Yes/No), but can be non-binary as long as the options are all mutually exclusive and collectively exhaustive. Every decision diamond needs at least 2 options coming from it to be a decision.

Swimlanes – Swim lanes describe either the user or group of users who performs the steps or the system in which a series of steps or decisions are taking place. The swim lanes for a single process flow should be all of one type (either user or system) to enable easier understanding. Swim lanes are a way to organize the steps in a Process Flow to focus attention and save space by not having to repeat the user or system in each step.

Incoming/Outgoing Elements – Since RML Process Flows are built in levels, every lower level (L2 or L3) Process Flow should have an Incoming and Outgoing element. These elements are the “You are here” for the Process Flow set. They tell you what process step immediately preceded the current process and where the reader will go next.

How do I derive user stories out of Process Flows?

Once the PO or BA has good draft Process Flows to work with, he can start deriving stories out of the Process Flows to build or add to his backlog.

The level of story derived depends on the level of the Process Flow and the complexity of the process. In most cases, each step in an L1 Process Flow becomes at least one Epic user story (too big to fit into a single sprint). Each step in an L2 or L3 Process Flow becomes one or more User Stories for the backlog, and each decision can be as few as 1 user story or as many as 7 user stories. See the examples below.

processflow2

processflow3

Because user stories are written from the user’s point of view and Process Flows are created from the user’s point of view, Process Flows lend themselves very easily to identifying user stories. For example, if the Process Flow step is “User logs into the system,” then the user story is very similar and might look like “As a User, I want to be able to log into the system so that I can access my account information.”

Decisions are a little more confusing because if it is a lower level decision (say in an L3 Process Flow), it might be one story with the decision lines being acceptance criteria. If it is an L2 Process Flow, the decision might lead to a story for each branch of the decision diamond. For this, the PO or BA will have to use her knowledge of the team and the process to decide what is best for slicing up the stories.

Conclusion

Process flows are one of the easiest RML models to derive user stories out of because they are from the user’s point of view and allow the PO or BA to walk through a process systematically and write user stories for each step that needs to be supported.

However, one final point is that these Process Flows don’t need to be perfect or complete to be useful. The PO or BA can draft a process flow, review with users or stakeholders, and derive user stories from an incomplete one. As long as there is traceability between the process steps and the user stories, it is easy to know what to update if the process changes or where the gaps are if new steps are added. Additionally, even team members other than the PO or BA can edit and update the processed if they live in a centralized location.

In the end, these are one the most useful models we find on customer facing agile projects because they are quick to make and update and lend themselves very easily to stories at all levels of the agile requirements hierarchy.

From The Archives: User Stories And Use Cases – Don’t Use Both!

We’re in Orlando for a working session as part of the Core Team building BABOK V3 and over dinner this evening we got to discussing the relationship between user stories and use cases (it wasn’t the only thing we discussed, we are also a social group ;-)).

We noted with concern that there have been a number of recent discussions (client, articles, blogs and general industry) of using both User Stories and Use Cases at the same time in Agile projects. This seems to us (with general agreement around the table) to be both a waste of effort and actively against the Agile philosophy of doing the simplest thing that will work and deferring the detail until just ahead of when the component of the product will be built.

We would like to outline the basic differences, considerations and risks of using this approach. Even it is seems to be a trending topic, we would like to fill the gap in addressing beyond the trend and move towards the practically and risks of using Use Cases on Agile projects.

Differences and Similarities

So what are the differences and similarities between User Stories and Use Cases, and when do we recommend using the different tools?

Use Cases

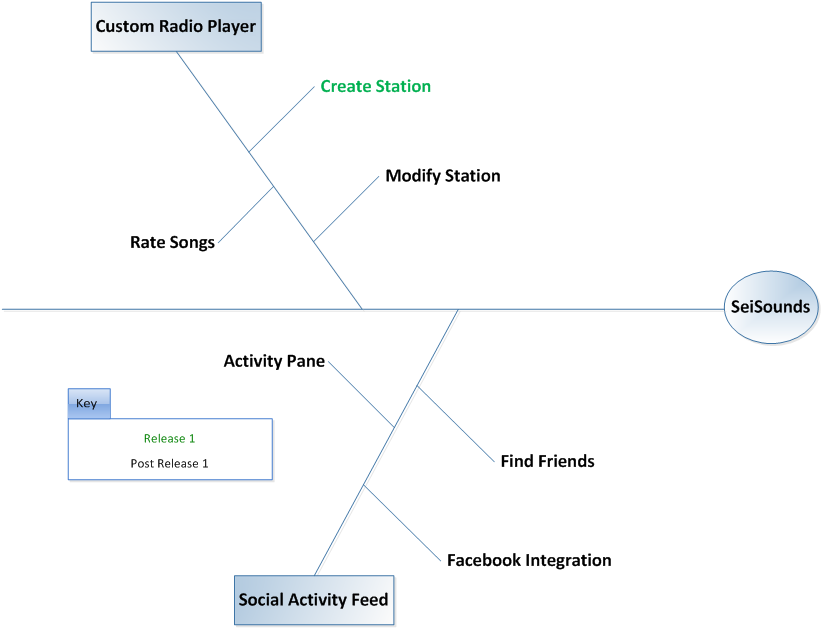
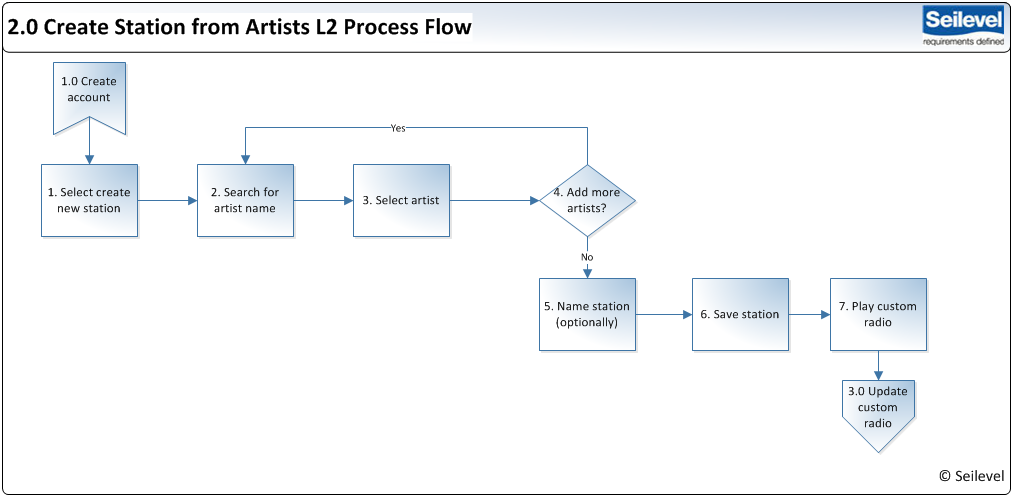
A Use Case is “an end to end sequence of interactions between an actor and a system that yields a result of observable value to an actor, usually the instigating actor”. Um, so what does that actually mean? Generally a Use Case (the textual description, not the stick figure diagram) is written as a flow or sequence of steps in the format

Actor does something
System does something
Actor does something else
System does something else

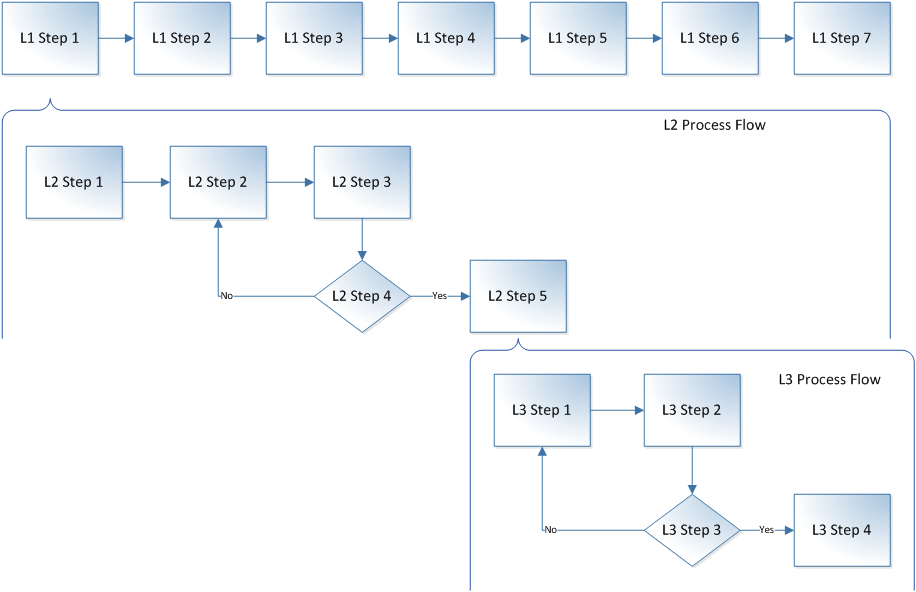
A Use Case is made up of one main flow and a number of alternate and/or exception flows some of which can branch back to the main flow.

Now Use Cases are by nature fairly detailed – they describe the steps in an activity and the points in the flow where things can change. To produce a useful (can be given to someone to build from) Use Case you need to define the set of interactions in quite a bit of detail, you need to understand what the business rules are that govern the activity, the options that the actor will have available to them when undertaking the activity, the ways things could go wrong and what bits of information are needed in the flow of interactions. To do this you need to spend quite a bit of time and effort analysing the activity and producing the document. This is BDUF – Big Design Up Front which is the antithesis of Agile.

User Stories

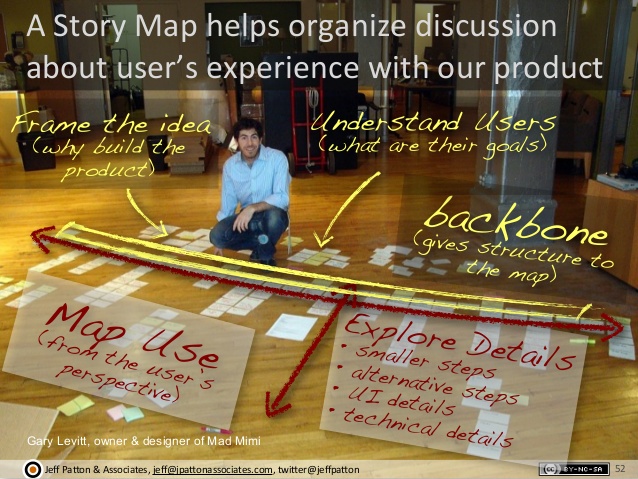
User Stories were originally a reaction to this big up front thinking. When Kent Beck defined eXtreme Programming (XP) he came up with the concept of a User story as a tool to support the iterative and incremental approach which is inherent in all the Agile methods. Mike Cohn went on to write a book which explained what User Stories are and how they are used in Agile projects. In addition to these two, Jeff Patton publicized the technique of Story Mapping to show how User Stories can be used to cover the breadth and depth of functionality needed in a product.

The key to writing good User Stories is to understand that the intent is not to provide the detail early on in a project, but to provide a framework where the detail can be added as it is needed, just enough and just in time. Drawing on the work of Beck, Cohn and Patton and many others the generally accepted approach to producing User Stories and using them to guide the development of the product follows a decomposition approach.

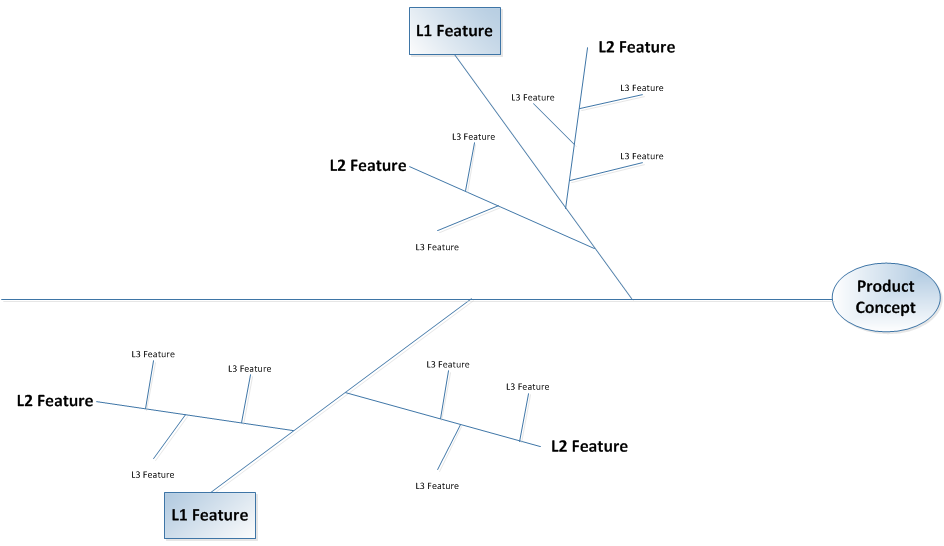
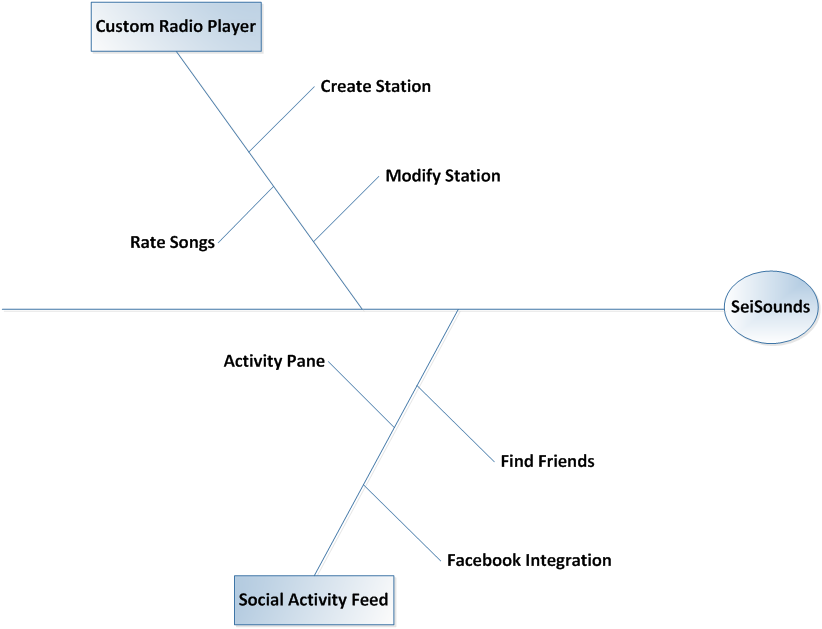
The decomposition comes in the form of a story map. The beginning of a story map is defining the Backbone stories – the key User Activities or Tasks which need to be accomplished to do the work of the product, the large discrete chunks of functionality which need to be delivered to be able to say we have solved the problem. These large chunks are often referred to as Epics (a big story ;-)), they equate to an elementary business process, something that is done in one place, at one time, by one person. Comparing this to Use Cases, this would be the result of the Use Case survey – a list of the discrete elements of the product, goals of the actors.

When building a story map, these Epics are normally laid out in a single row showing the logical sequence and handoffs between the steps in the process. Visually these Epics will be written on a different colour card to t e User Stories which will come later.

wick mar4 2

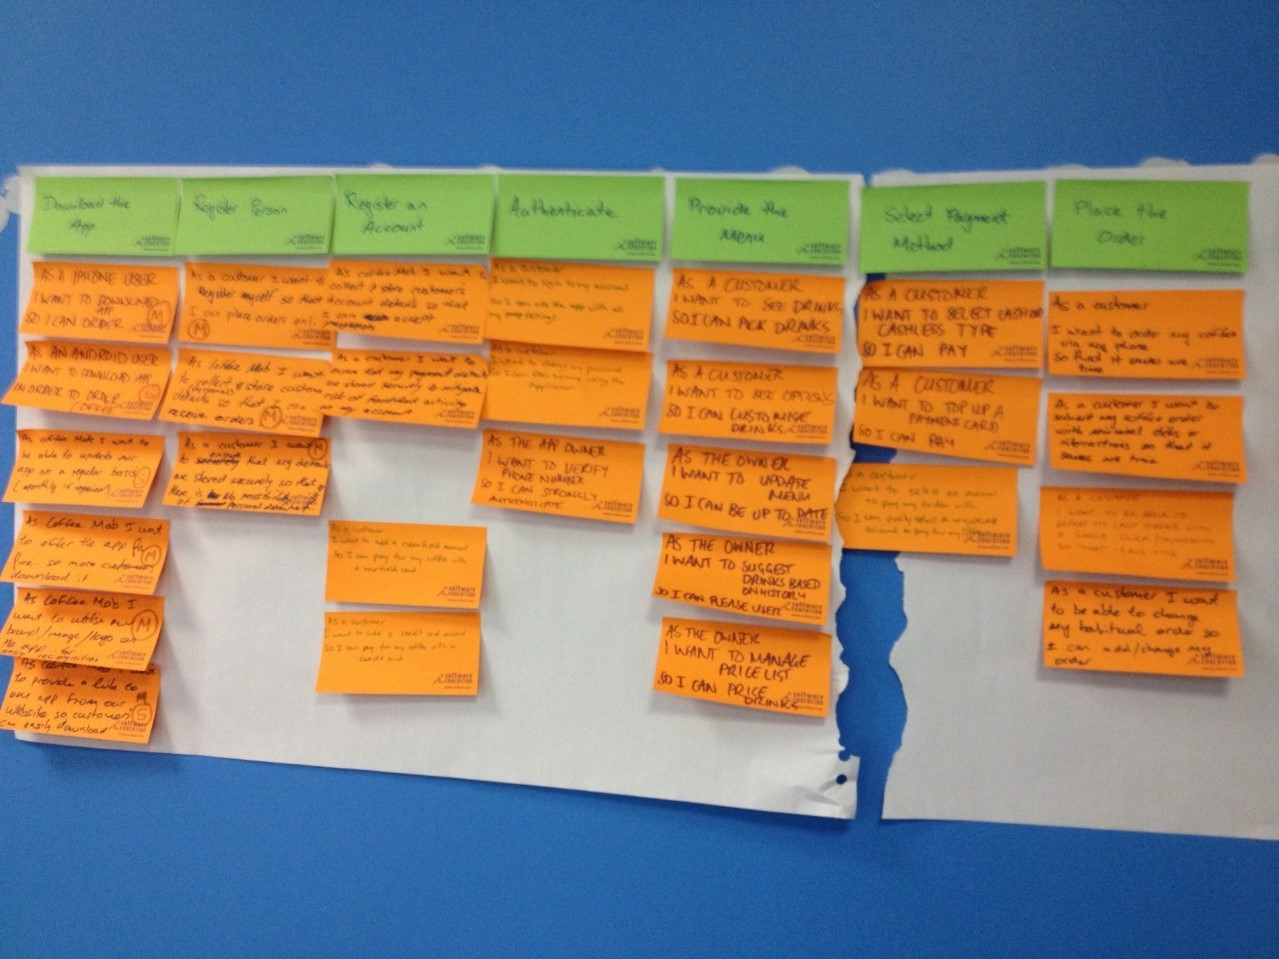
Image: An Example of a Story Map – Epics in green along the top

Epics can be put in sequential order along the top (if sequence is appropriate, which it normally is).

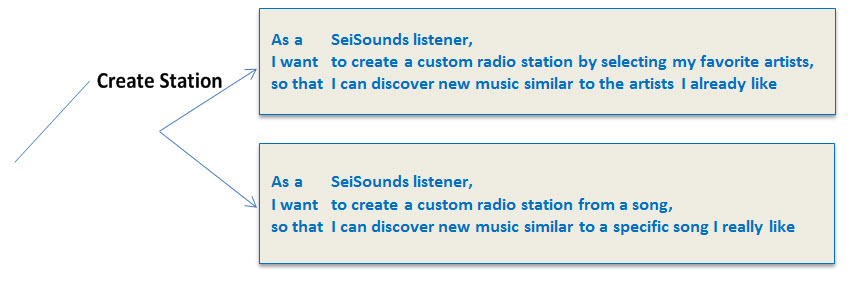
The next step in the Story Map is to populate the map with the User Stories that fall under the Epics. Each User Story is a small, discrete piece of functionality that has value to some user of the product and is a decomposition of the Epic above. The most common format for writing User Stories is “as a (role) I want (feature or capability) so that (business value to be delivered)” –

  • As an internet banking customer I want to list my account balances so that I can understand my financial position.
  • As an internet banking customer I want to list transactions on an account so that I can check the detail

The three elements are important – knowing who the story is for helps ensure we build a useable product, what the functionality is that is needed and the value which will be derived from having that functionality enable us to make good priority decisions.

Related Article: Technical User Stories: What, When, and How?

Priority based on business value is very important to defining User Stories. Knowing the value from a story enables us to make good decisions about the sequence of work – building the most important business value components first and getting feedback early rather than trying to build everything at once is inherent to Agile.

The User Stories are the orange cards in the image above.

Priority and Sequence Shown in the Map – identify the MVP

One of the benefits obtained by building a Story Map that shows the logical flow of activities (from Epic to Epic along the top) and the discrete elements of those Epics vertically down the page is the ability to clearly see both sequence and priority. Stories that are higher up on the map are more important (needed sooner) than those lower down.

The prioritisation and sequencing approach enable the discovery of the Minimum Viable Product (MVP) – those elements which need to be delivered to provide the opportunity to learn and adapt the product based on feedback from real customers/users. Finding the true essence of the product and getting that into the hands of real customers (probably just a small subset initially but enough to get feedback to validate the assumptions being made in the development of the product).

In a real-world internet banking example, the very first version of the product which was put in production had the ability to log in and to list balances and this version was used by the project team and a small group from within the bank. Having this “walking skeleton” built and put into production validated the architecture of the product, identified a number of unexpected challenges with the deployment process and gave the team feedback about their design philosophy which enabled them to make some significant changes when they were cheap and easy to do.

The Elements of a User Story

In his book, Mike Cohn says that a User Story has three C’s – the Card, the Conversation and the Confirmation. The Card is the initial User Story, written on an index card or PostIt note. This is deliberately short and devoid of detail. The intent is to defer the detail until later in the project, just ahead of when this piece will be delivered. The detail is established through the second C – Conversations. As the project progresses and elements are delivered there will be a number of conversations that result in clarity of understanding about what is actually needed to deliver the value identified in the User Story.

The final C is Confirmation – these are the Acceptance Criteria for the User story – the details which will enable the customers and the technical team to agree that “if this story meets these criteria it is done”. This is the detail which is all too often left out in bad Agile projects (“Tragile”). This detail needs to be agreed to, and it will contain whatever is needed to enable the delivery of this component of the product. The key difference between Agile and other approaches is when we produce this detail. In an Agile project this will be produced collaboratively with the customer representatives just ahead (a couple of hours to a couple of days) of when the piece will be built.

The most common format for these acceptance criteria is the structure of Acceptance Test Driven Development. Each user story will have a number of acceptance criteria and may also have other elements which will help ensure the right thing is built – these could include screen mockups, technical notes, models such as class diagrams and whatever the team needs to enable them to deliver the business value.

Examples (for the list account balances user story)

Given the customer has one credit account and one savings account
When they have logged in successfully
Then the two accounts will be listed in account number order (Account no, Name, Balance, Available Funds)

Given the customer has no accounts
When they have logged in successfully
Then a message indicating that there are no accounts to show will be displayed

Given the customer has twenty one accounts
When they have logged in successfully
Then the first twenty accounts will be listed in account number order
And a Next Page option will be enabled

Given the customer has twenty five accounts
And they have logged in successfully
And they are on the first page of the list
When they activate the Next Page button
Then the list will be cleared
And the list will be populated with the last five accounts
And the Previous Page button will be enabled
And the Next Page button will be enabled

Gojko Adzic’s book Specification By Example provides an excellent reference on how and when to produce acceptance criteria.
Ultimately the Acceptance Criteria will be proven through a set of test cases (ideally automated) which show that the product works as needed to deliver the business value.

Reduce Waste and Be Responsible

Again, the key to reducing waste and rework is to defer this detail until just ahead of when it is needed, rather than trying to clarify it all up front. Things will change over the life of the project and deferring the detail makes it cost-effective to adapt to this change.

However – taking this just-in-time approach is not an excuse for poor architecture or bad design. Early on in the product development it is important to set clear architectural guidelines, design principles and deal with what Philippe Kruchten calls the “Architecturally Significant Non-functional Requirements” – those aspects which will be extremely expensive and difficult to refactor later. Note however that we say “guidelines” and “principles” – don’t try to build the complete architecture up front, allow it to be emergent inside the boundaries of these clear guidelines.

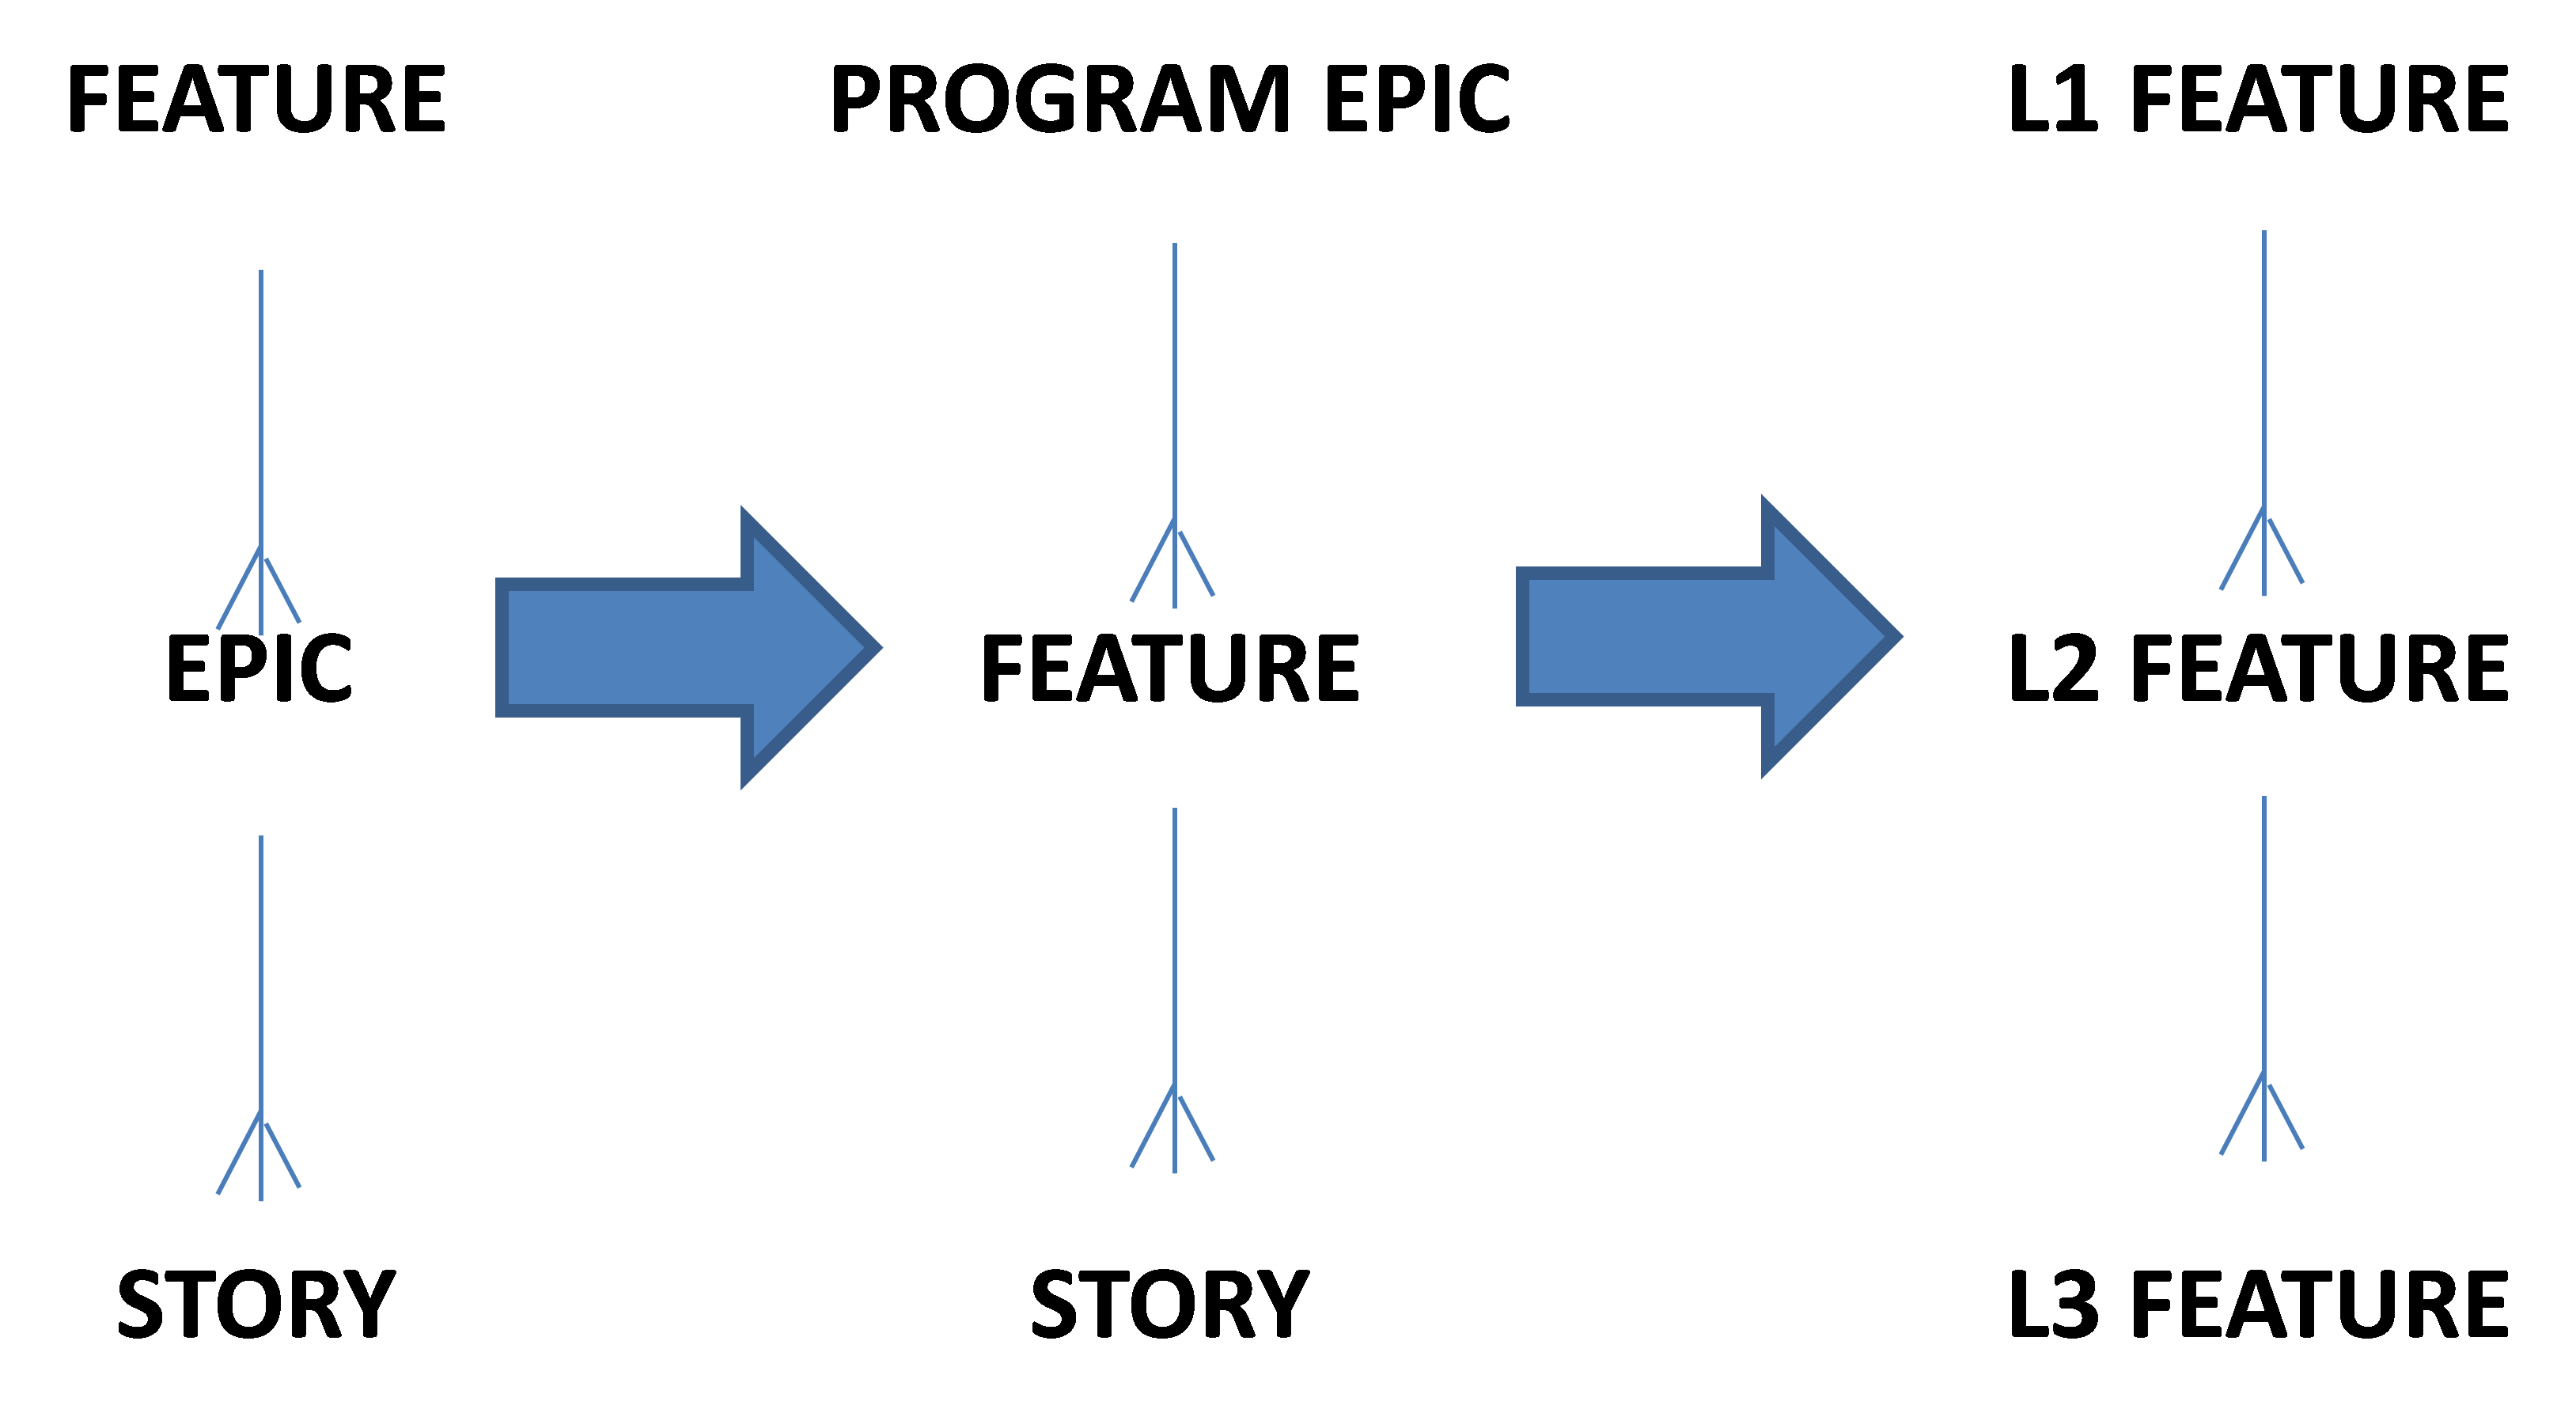
Traceability in User Stories

Hopefully it is clear from this description that User Stories actually have a powerful traceability mechanism built into the design of the technique.

There is a cascading one to many relationship:

  • A Role or Class of User derives value from one or many Epics
  • One Epic could have many User Stories
  • One User Story will eventually have many Acceptance Criteria
  • One Acceptance Criterion will have multiple Test Cases which prove it is working as expected

This traceability is enacted through the “so that” component of the user story, which ensures that every piece which is implemented has a direct relationship to the business value to be derived from that component/capability.

Timing Makes the Difference

The key is the timing – User Stories are deliberately abstract early on in a project and will evolve over time on a just-in-time and just-enough basis. This is because Agile projects expect and anticipate change and respond to this change by adapting the product to the evolving needs. More User Stories will be added, some will be dropped and our understanding of many will change as time progresses. The reality of today’s business world is that change is inevitable, so trying to define the detail of all aspects of the upfront will result in lots of wasted effort and time as much of the work will need to be redone.

The Story Map is a fluid and changing tool – as stories are completed they are removed, new ones added and change is accepted as a normal part of the way we maximise the delivery of value to our stakeholders and the organisation for whom the product is being built.
The detailed Acceptance Criteria for any User Story will on be produced just ahead of when it will be delivered, maximizing the amount of work not done (one of the 12 principles of the Agile Manifesto)

One of the mistaken and dangerous myths of Agile is that “Agile projects have no documents” – the reality is Agile projects have the documentation that is needed to ensure value is delivered, and nothing more. The philosophy is to defer work until just ahead of when the output of that work is needed (a concept inherent in Lean thinking) and only do that work which is necessary to achieve the desired outcome (preventing waste from unnecessary effort and rework).

This is in stark contrast to Use Case thinking where the goal is to define in the various flows of the use case all the detail of the requirements up front. This approach will inevitably result in wasted effort as the use cases will have to be maintained and updated as the changing needs emerge. In agile we want to evolve the solution iteratively and incrementally as we learn based on feedback from real customers/users, not rework the documentation and requirements.

Could you use Use Cases instead of User Stories in an Agile project?

Theoretically Yes – you could indeed use Use Cases instead of User Stories to express the business needs. None of the Agile approaches are prescriptive about how you express the list of capabilities/features the product must contain (what Scrum calls the Product Backlog), however we see significant risks in trying to do so. Use Cases miss the mark on the “WHY”; they are not well suited to expressing the separate pieces of business value and supporting the iterative, incremental approach to developing the product – they tend to be monolithic and encourage an “all or nothing” way of thinking vs. an adaptive evolutionary style of learning and discovering the solution together through quick build and feedback loops.

Could you build Use Cases after developing an Agile solution to document the requirements after the fact?

Theoretically, yes . . . however with this approach you have missed out on a critical technique in User Stories to guide conversations towards maximising value and minimising extra work throughout the development process.

Risks and Dangers of Use Case Thinking in Agile Projects

  • Compromised Innovation
    • Use Cases bring on a lot of detail before getting feedback on a built product. This cognitively brings user mind-sets into a predefined interaction and solution, negating the potential for further innovation. The exploration and learning aspect is compromised and focus goes from solving a need to perfecting an already defined solution.
  • Compromised Timelines:
    • Too much detail before building compromises the benefits of time in the Agile approach. Spending time detailing out Use Cases is spending time on what and how when we be should focusing on the why. Defer the what and how until just ahead of when it is needed
  • Compromised Value:
    • Use Cases confuse the role of Acceptance Criteria in User Stories and agile. Many teams are using Use Cases as an alternative to creating Acceptance Criteria for their User Stories. Acceptance Criteria evolve in levels of detail as builds iterate and evolve and more is learned together through the agile process. This learning process is where the value lies as the needs are quite unknown before starting.

Conclusion

Many teams embarking on their Agile journeys are finding comfort in techniques used in the past for requirements definition, particularly Use Cases. Use Cases resemble user stories in more detail, and User Stories were developed as a condensed technique to alleviate the lack of WHY in Use Cases and to alleviate too much detail too soon when using an Agile approach.

We believe that User Stories and Acceptance Criteria are the techniques aligned to deliver the benefits of the Agile approach and Use Cases compromise and put the benefits of the Agile approach at risk.

Teams thinking about using Use Cases should strongly consider looking at the methods and evolutions of defining Acceptance Criteria (especially the model) with many scenarios and levels of detail that evolve as feedback through the iterative cycle and delivering increments of the product as it evolves. Keeping with user stories (Including story maps & epics) along with well defined and evolving acceptance criteria will meet the goal of leveraging the benefits of agile without putting timeline and value at risk.

Don’t forget to leave your comments below.

About the Authors

shane hastieShane Hastie

Shane is the Chief Knowledge Engineer and Agile Practice Lead for Software Education, a training and consulting organisation based in Australia and New Zealand, working all around the world. 

Shane teaches courses and consults around business analysis and agile and is passionate about bringing the two communities together.
He is a member of the board of the Agile Alliance, and is the lead editor in the Process and Practices community on InfoQ.com
He can be reached at [email protected] and on twitter as @shanehastie

awickAngela Wick, CBAP, PMP

Ms. Wick is passionate about inspiring innovative BAs and is a leader in the business analysis field. Angela is a trainer of business analysis, project management and in bringing innovation and creativity to these roles. She enjoys working with traditional and agile teams, and especially in preparing teams for agile in their organization. She also consults with organizations in building BACoEs, BA practices, BA Career Models, and BA competencies. Angela is a lead contributor to the BABOK v3 and the IIBA Competency Model. Angela is also a monthly blogger on BaTimes.com

Angela can be reached at [email protected] and on twitter @WickAng

Both Shane and Angela are Core Team members for the IIBA team building version 3 of the Business Analysis Body of Knowledge (BABOK)

User Stories and Mousetraps: A Lifecycle of Conversations

I teach quite a few teams about User Stories. Most struggle with the concept, at least initially. One of the key challenges for many is the notion that stories are iterative. That you visit and refine them often, instead of the “once and done” view that we have for traditional software requirements.

Part of that revisiting is reinforcing the collaborative nature of the stories. The nature that says they are “intentionally incomplete” in order to encourage conversations around the story. Remember the 3’C’s from Ron Jeffries: Card-Confirmation-Conversation, with conversation being the most important ‘C’?

I thought it might be helpful to go through a life-cycle example of how stories morph and change as they approach an execution-ready state. So here goes a somewhat contrived example—

galendec1
http://courses.knox.edu/theatre121/Mousetrap.html

Product Owner ideation of a few “stories” related to a new mousetrap. Call them “Epics”

Here’s the core Epic: As an exterminator, I want a better mousetrap, so my customers stop calling me in the middle of the night about ‘rodents’

  1. Build a better mousetrap
  2. Build a board level framework to support the mousetrap
  3. Find the right “trapping” mechanism for the mousetrap; including high strength material

The product owner gathered this list from their constituents and stakeholders from a “back of the napkin” perspective.

At this stage, it’s just good ideas that need exploration and team-based analysis.

Backlog Refinement meeting #1

The Product Owner wants to get a sense for the “size” of these high-level epics from their team. At this stage, they might select a few specific individuals to help in the sizing, so as not to interrupt the entire team.

Since these epics are simply potential ideas, they want to assess their technical complexity and relative level of effort quite quickly. Investing as little time as possible, but still getting a “reasonable feel” for the work.

They use T-shirt sizing: S, M, L, XL, 2XL, etc. so that it’s fast. What’s different here is that the T-Shirt sizes relate to “Release Trains” or release chunks.

  • A Small “fits” into a ½ Release Train (20 sprints)
  • A Medium “fits” into a Release Train (40 sprints)
  • A Large requires 2 (60 sprints)
  • An XL, requires 2-3 (100 sprints)
  • A 2XL requires 2-4 (100+ sprints)

After a relatively quick meeting:

• Story #1 the core Mousetrap is sized as an XL by the team.
• Story #2 – is sized as a Medium
• Story #3 – truly is said to be a “Research Spike” and is sized as a Small

The team moves on…

The Product Owner now has some very early, high-level sizing information to initiate investment discussions with their stakeholder team. Note that these aren’t commitments or firm estimates, but instead are high-level, informed guesses.

Off-line discussion: The team is intrigued by the XL parent story and starts to brainstorm how they might go about decomposing it.

  1. Build the base
  2. Build the bait mechanism
  3. Acquire the bait and determine storage requirements
  4. Build the triggering mechanism
  5. Determine the performance requirements – speed, stun level
  6. Determine the size of the mouse the trap can accommodate; no Godzilla mice allowed
  7. Build the packaging for the mousetrap
  8. Build the directions for the mousetrap; include “loading”, “setting”, and “cleaning” 😉

Question comes up about “cascading” mousetraps. For example, for truly infested areas, can/should they connect them together in a “defensive perimeter”? Clearly this needs more investigation.

Backlog Refinement meeting #2

The Product Owner has decided, with the stakeholders, that the mousetrap needs to be built. The following are some high-level clarity that has been added to the epic:

  1. It needs to be built in one Release Cycle
  2. It needs to be very simple – no Rube Goldberg solutions
  3. It has to be sell-able in US, across North & South America, and Yemen
  4. The materials can only cost $1.30 and the manufacturing cost needs to be keep to $.30/piece
  5. Target price is $5.00 for the “Better, Most Reliable, Mousetrap”
  6. It does not need to be “cascade-able”

The Product Owner asks the team to respond to this request with a story brainstorming exercise to gain a feel for the overall scope for a much more complete decomposition of the work.

Story Writing Workshop

The Product Owner reviews a presentation that represents the high-level vision and goals of the leadership team.

Instead of immediately diving into writing stories, the team starts brainstorming roles for the application. After some passionate discussion and debate, they come up with the following initial / primary roles:

  • Rodent infested home owner
  • Older home owner, trying to avoid a heart attack induced by rodents
  • New home owner
  • Pest service selling rodent removal services

Next they start writing stories. The roles are helpful in that they break up into smaller groups and brainstorm stories aligned with each role. The roles give them a different and more specific perspective than the simple “As a User” role would.

They also write the stories aligned with the key requirements from the stakeholders. In many cases, these requirements not only inspire functional user stories, but non-functional stories, infrastructural stories, and research spike stories. So there is a broad and deep mix created.

Here’s a sample of some of the spikes they think of:

  1. Materials investigation, emphasis on pricing and meeting regulations.
  2. Performance requirements: build a prototype and run experiments for:
    1. Size of the mice;
    2. Speed (spring material and tension) necessary to “stun”;
    3. How long the devices need to “retain” the mice.
  3. The team wants to use a Java-based framework to build the overall trap and they have little experience with it. They need to “play around and learn”.
  4. Material supplier and pricing investigation to ensure the expense requirements can be maintained.
  5. And throughput is in question, since the target is “rodent infested”, what are the potential mouse/hour capture rates?

Estimation

One of the goals the Product Owner had by investing in the story writing workshop was to gain a much more holistic view to the functional work associated with building the mousetrap. In other words, to convert those early stories and estimates into something much more finely grained and tangible with the team.

To that end, the Product Owner and the team establish another scale for estimation that is slightly more finely grained.

Again, T-shirt sizing will be used: S, M, L, XL, etc. will be used so that it’s fast. What’s different here is that the T-Shirt sizes relate to sprints:

• A Small “fits” into a ½ sprint
• A Medium “fits” into a full sprint
• A Large requires 2-4 sprints
• An XL, requires more than 5 sprints

The Product Owner and the team go through the entire list and estimate the stories. This gives the PO a more detailed sense of the level of effort to execute their current vision AND to start trimming things out to fit things into a single release cycle.

They still don’t know if that can be done, nor if the stakeholders will “buy into” the newly established views toward scope. But they continue to “chip away” at the work to better understand the scope, complexity, and overall level of effort. And of course, they include the entire team as much as possible as they drill into the details.

Why you might ask?

Because ultimately the team will be chartered with doing the work – so including them only makes good sense.

Eureka – Alignment

There are a couple of other techniques, probably with many variations, that help the team, Product Owner, and stakeholders align on the ASK vs. what’s FEASIBLE. First is story-mapping, where you align your hierarchical stories based on customer usage.

galendec2

I borrowed this picture from Jeff Patton here –
http://www.slideshare.net/jeffpatton/user-story-mapping-discovery-the-whole-story

It would be like aligning Microsoft Word features based on the high level menu. In story-mapping, you start grouping your stories in clusters in the way in which your customer might be using them. Think customer workflows. What’s interesting about this technique is several-fold:

  • You start grouping stories into functional themes and prioritize the themes instead of the stories. This makes prioritization and planning easier.
  • It exposes any underlying requirements for infrastructure, architecture, UX, and any other “plumbing” needed to enable the higher level functionality.
  • It also is a great way to uncover dependencies that ultimately will need to be negotiated between teams.
  • It also helps in creating your products with MVP chunks that immediately begin resonating with your customers.
  • And finally, it puts the “customer first” in your discussions (or the persona’s first) if you will. So, it helps to keep a customer focus.

The other technique is release planning. Again, here we’re aligning stories according to project execution dynamics. I like to leverage both techniques because they each give me, and more importantly the team, different views towards the workflow for feature development.

Instead of going into the details here for release planning, I’ll point you to an article I wrote quite awhile back that explores the technique in much more detail.

Another nice reference for release planning is in the Scaled Agile Framework or SAFe. In SAFe, there is a periodic event called PI (Program Increment) Planning that is essentially the same thing as release planning. It’s an event where the entire team gets together to:

  • Decompose their epics into stories;
  • Layout those stories in time;
  • Negotiate architecture, design, and technical risk areas;
  • Negotiate internal AND external (cross-team) dependencies;
  • Negotiate quality and testing centric focused efforts.

And pull together a holistic “high level plan” that the team thinks is feasible and sound. If the stakeholders and the Product Owner agree on the effort vs. scope, then this “list” becomes the working Product Backlog for the team to begin actually sprinting and delivering meaningful chunks.

Ongoing Refinement meetings

You need to keep in mind that agile teams are constantly refining their backlogs. It doesn’t just stop at some discrete point. Instead, the stories are refined until they are ready for sprint execution.

So completing story-mapping and release planning, while a significant step forward for the team in getting their arms around a project efforts, is only the beginning. As the team starts to execute sprints, they continue to refine the backlog into more discrete chunks.

Quite often, they are not only looking within the current release, but if they’re mature, they’re starting to get their arms around the technical aspects of the next release as well.

Sprint Planning, Execution, and of course, Delivery

One of the first activities after release planning is to tee up your first sprint. All of the planning and estimation the team has explored so far are simply that…estimates. The team hasn’t delivered a thing yet and they don’t have a reliable sense for their velocity to compare back against the estimates.

So there should be a sense of urgency in any Agile team to move as quickly as possible from “talking about” the work, to actually “doing” the work, delivering sprint work, and measuring their velocity.

The teams’ Definition of Done becomes incredibly important here as well, as it contributes to a stable velocity of the team consistently adheres to it.

Wrapping Up

My key goal in writing this article was to explore or show you the cyclical nature of the conversations that surround the evolution of user stories. The other missing piece is documentation. Often the Agile community gets falsely accused of not delivering any documentation. And to be fair, there are many immature Agile teams who don’t.

But nothing in the methods or the mindset is contrary to documentation and I usually recommend that teams keep notes of their conversations during the entire story evolutionary process. These are detailed requirements, but they ARE note surrounding clarifying discussions, critical decisions, and the why behind the story.

They also include the teams’ memory as I mention in this related post.

I hope your own mousetraps are developed iteratively, collaboratively and well.

Stay agile my friends,

Bob.

  • 1
  • 2