How to Fill the Potholes in your Business Requirements
It is springtime in Ottawa, Ontario, Canada. Beautiful, glorious, Spring! Everywhere you look, the signs are there: frozen rivers are starting to flow, birds are returning and filling the air with their sweet melodies, snowbanks are shrinking, and…oh yes, potholes are showing up everywhere in the roads. As much as I try to avoid them, somehow they always get me. It takes a special breed of car to survive the tough Canadian winters. My Honda Civic is on it’s 10th year, 161,000 clicks, and still going strong.
Trying to avoid the springtime potholes is a fair analogy to a task that I am often asked to do as a Senior Business Analyst: reviewing and providing constructive criticism on business requirements written by someone else. A road filled with potholes can wreck your car, just as a poorly written set of business requirements can wreck a project. My job when reviewing business requirements is to look out for these potholes, make the writer aware of them, and provide suggestions on how to fill them.
Digesting business requirements written by someone else can be challenging, depending on the writers experience, knowledge, and ability, so to make things somewhat easier, I provide a template for my clients to use. Before they start their requirements, I will meet with them to explain how to use the template and to discuss any questions they may have. Using a template, I at least know the intent of all the sections of the document, and it gives a greater consistency to the documentation I have to review.
Once the written requirements are sent to me for review, I start by analyzing the document from beginning to end. One of the first things I look for are acronyms or business terms that have not been defined. This usually happens because the writer thinks that they do not need to elaborate on the use of terms internal to their business unit, but they forget to consider the audience of the document they are writing. Clear and unambiguous definitions of business terms are especially important to the developer, as they can have a direct impact on how they architect the system.
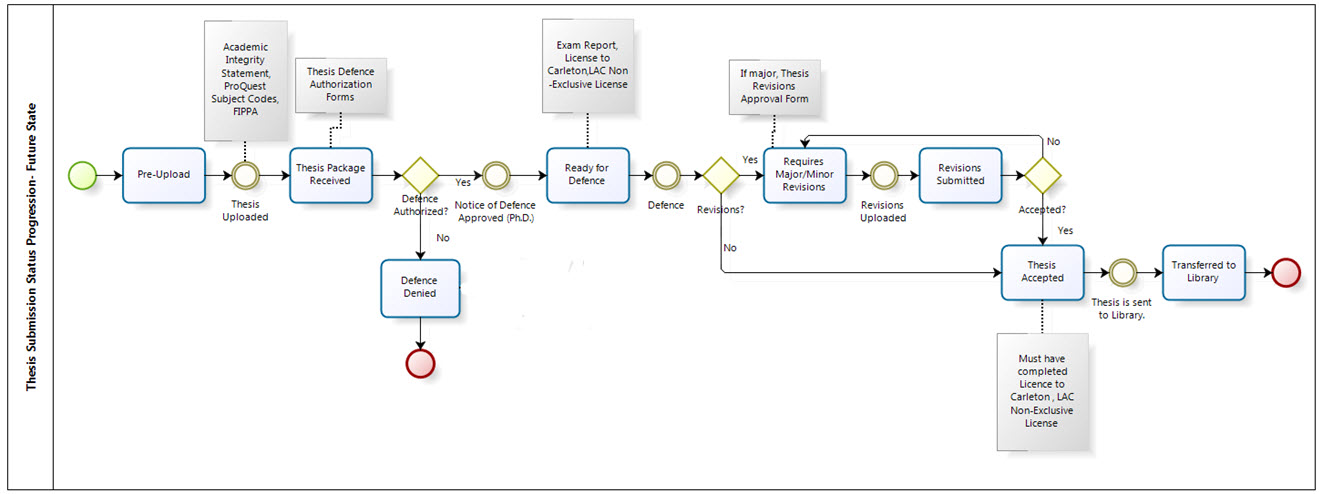
I also pay a lot of attention to the process diagrams of the current and future states. It is a very common mistake to omit the alternative paths to a process. It is understandable how this can happen. People assume that because the process usually happens a certain way, that they do not need to mention the other rare scenarios. Others may think they only need to describe the perfect world scenario, and forget to think of all the what-ifs. For a manual (non-computerized) process, unusual scenarios can be dealt with simply by communicating with those affected. When the process goes electronic, it is another story. The programming logic has to include all the alternative paths, or the system could fail spectacularly. This is a mind-shift for people that can take some getting used to.
When I am ready to dig into the detailed requirements, there are a few things I am on the lookout for. First of all, what I do not want to see are long, wordy paragraphs with several requirements buried within it. It may feel more natural to write this way, but not only is it painful to read requirements this way, it also greatly increases the likelihood that a requirement will be missed somewhere along the way, either during the development, or in testing. A much safer practice is to write each individual requirement separately, and give it an identification number. That way, even if a requirement does get missed during development, it will get picked up in the testing, assuming your test scripts have appropriate requirements tracing as well! That’s the topic of another post.
Secondly, I want to see a clear link between the in-scope deliverables laid out in the project charter, and the detailed business requirements. This is so important, because people can and will forget (perhaps conveniently sometimes) the original goals of the project, and before you know it, the scope of the project has grown exponentially. Believe me when I say, this is a crazy train that you do not want to be a passenger on. To create that linkage, what I will do is ID each of the in-scope deliverables, and use them as the parent IDs for the detailed “child” requirements. That way you know where each requirement is coming from.
Finally, I watch out for requirements that delve too deeply into design details without properly explaining the need behind it. This is a risky thing to do because when describing design details as a part of requirements, you limit the technical architect’s (or whatever you call that role) ability to design the best system to meet the client’s needs. That said, there may be cases where a specific design may be warranted, but the reason for that should be explained clearly. There are, in fact, some people who feel that requirements should not contain any design details at all, and only state the need. Others feel that not only is it ok to include design in the requirements documentation, but fully expect it. This is a contentious issue that I will not attempt to resolve here, but suffice-to-say that you should do your homework before you start writing your requirements. Find out what the practice has been in past projects, and what is expected of you now.
While this is not an exhaustive list of everything I am on the lookout for when I review someone else’s business requirements, this represents the bulk of my work. Hopefully you’ve read something new in this post, or at least can relate to what I’ve written.
If you would like to weigh in on this topic, please leave your comments below.

 To give you some background about the project that the State Transition Diagram presented below is based on, the submission of Master’s and Ph.D. theses in my institution is not overly complicated, but there are many different forms that must be completed by a variety of people, including students, administrative staff, and faculty. I needed an easier way of explaining all the steps of the process and what forms were being released at each step. Enter the State Transition Diagram.