
Tag: BPM

How to Facilitate Successful Process Mapping Sessions

Process mapping is often the first step in business process improvement. It is a necessary activity that provides a baseline from which improvements can be measured and is the key to identifying and localizing opportunities for improvement. Therefore, it is important that facilitators capture the right information to help steer process improvement initiatives in the right direction.

To have successful mapping sessions, facilitators must possess the ability to lead (steer the direction of meetings), manage people (deal with conflicts and diversions), and persuade participants to open up and share the knowledge they possess.

This can be challenging when dealing with large groups and complicated processes. To help to ensure that you have a successful process mapping session, follow the guidelines outlined below.

Be Aware of Scope Creep

Off-topic or side conversations can lead to the kind of scope creep that takes time away from the original goals set for the meeting. It can also lead to the capture of irrelevant data. It is easy to get off topic in any meeting. When conducting process mapping sessions, additional challenges exist.

Mapping sessions are designed to bring SMEs and various groups together to document how tasks are performed. However, these sessions often serve as a learning experience revealing for the first time details about a process and its challenges. Because each participant may have a different level of understanding about the process, this can contribute to extended discussions about issues. These discussions can be enlightening and sometimes necessary, but can also get the meeting off-topic. For example, let’s say group A is using a manual process to calculate input for a step and it is revealed that group B is utilizing a tool that could be implemented by group A. This tool could eliminate the need for the manual process. This, of course, sparks an interest for group A and leads to a discussion about the tool rather than the overall purpose for the meeting. These types of side or off-topic conversations often happen as process issues are revealed. The facilitator must have the ability to put a time limit on these discussions and be able to determine the difference between relevant and irrelevant conversation to protect the goals of the meeting. Remember, process mapping sessions are not for solving problems – they are for the purpose of identifying and documenting potential problems.

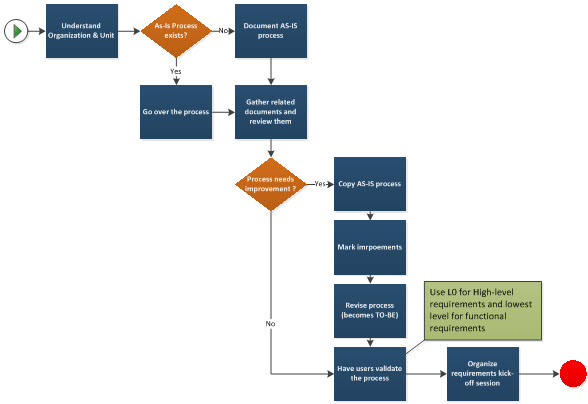
Mapping sessions can also get off topic by the compulsion of participants to document processes as they “should be” and not how they exist in its current state. Mapping sessions typically begin by documenting the “As Is” or “Current State” process to identify opportunities for improvement and then end in the design of the “To Be” or “Future State” process after teams solve problems. Although it is a great sign when participants recognize during meetings better ways to do things, it is counterproductive to prematurely document the “Future State” before establishing a baseline for the improvement effort. It is the job of the facilitator to identify when this shift occurs and get back on course.

Capture the Right Amount of Information

As a facilitator you must be able to determine the right level of information to capture. Whether you are capturing too much or too little information – both extremes can be a waste of time and not address the overall purpose of the project.

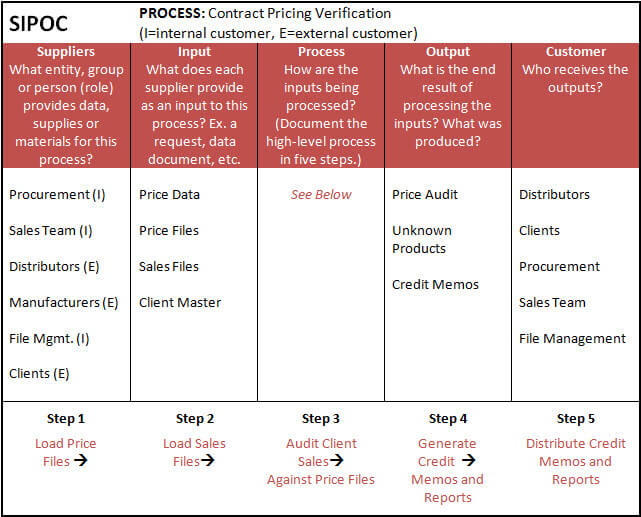
Process mapping standards identify Level 0 or the steps identified in a SIPOC as the starting point for most mapping efforts. SIPOCs (Supplier, Input, Process, Outputs, Customers) are used to identify roles, inputs and outputs and high-level steps of a process. (To learn more about SIPOCs see the article “The Four Agreements You Need to Have a Successful Process Mapping Session”)

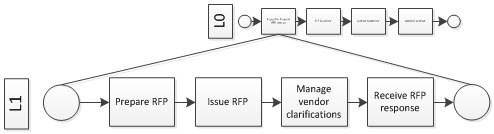
It is best to start with a high-level map (Level 0) and identify what topics need to be fleshed out from there. Additional levels can be mapped accordingly (see Figure 1). The various levels can be described as follows:

  • Level 0 – high-level core steps of a process listed in six steps or less.
  • Level 1 – drills down from the core steps and describes the steps involved in a process at the next level.
  • Level 2 – describes the step-by-step details of a process.

You may need to drill-down further to uncover bottlenecks and inefficiencies of a process, but it is important to get input from SMEs about relevancy of the data being captured and regularly compare project goals against your process mapping efforts to help make sure that you are steering the meetings in the right direction.

gaillard July21 1
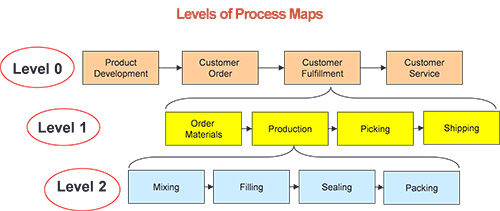
Figure 1 – Levels of Process Maps

Make Sure the Right People Are In the Room and/or Available For Participation

There is nothing like being in the middle of a successful mapping session that suddenly stalls because no one in the room knows exactly what happens in the next step! If this situation occurs, you simply do not have all the right people in the room. The SIPOC reveals your suppliers and customers or those representative groups that should be in the meeting. However, sometimes the right individuals are not chosen to participate. Instead, managers and/or process owners are chosen to represent departments when actual processors should be in the room or available for contact during the meetings. Often sponsors are reluctant to release critical resources from core work, but it is well worth it to lobby with sponsors to provide the proper representation for the mapping session to capture information correctly.

Proactively Address Conflict

Business professionals who attend meetings regularly have first-hand knowledge of how unproductive meetings can be when attendees are disruptive. Conflict that exists between individuals, departments and/or organizations can make its way into your process mapping session and prevent you from capturing critical details of a process or impede progress.

It’s important to uncover potential problems that may arise during a mapping session and proactively respond prior to the meeting. How can you prepare for these types of challenges before the meeting? Implement tools from change management principles and conduct a simple/modified risk or change readiness assessment prior to the session. Knowing beforehand the challenges groups face with their processes and/or between groups will help you prepare a response and manage behaviors in the meetings.

Here are five important things you should know prior to a meeting. Ask these questions of each sponsor and/or process owner:

  1. Do you support this initiative?
  2. What concerns, if any exist about this effort?
  3. Do your SMEs have the time and energy to participate in this effort?
  4. Are SMEs motivated to participate in the mapping activities?
  5. Do you have good relationships/rapport with external groups that will enable your team to work efficiently during the mapping sessions?

If conflict exists, it is best to deal with it openly and honestly. Start with the sponsors. Reiterate the overall project goals, restate the purpose and stay passionately neutral during the process. Taking a side will cause other sides to shut down and you will lose engagement immediately preventing the accurate capture of data. Transparency about the process and having courage to address problems will allow facilitators to meet the goals of the mapping session.

Structure Meetings to Have the Least Impact on SMEs and Groups

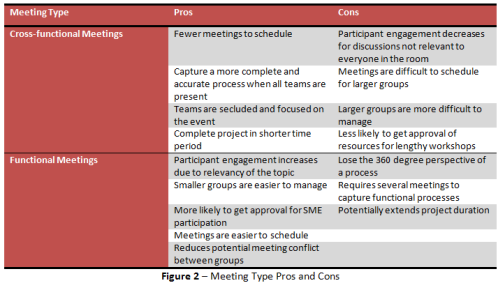
Process mapping sessions that are lengthy and continuous can lead to waning support. There are a few ways to construct meetings to keep participants engaged. Facilitators can hold “Cross-functional Meetings” or “Functional Meetings”. Each type has its pros and cons, but each can address issues surrounding participant engagement.

  • Cross-functional Meetings – this type of meeting gathers all teams from across functions to participate in the same full or half day workshops to map out processes.
  • Functional Meetings – allows functional groups to gather independently to map processes related to the functions they perform. If there are six groups involved in a process, six separate meetings will be held to capture the processes of each function. The individual functional maps are consolidated to create one overall map of the process and then presented at a review meeting where all SMEs and groups will gather to review and approve the final process map.

See Figure 2 for the pros and cons of each meeting type.

gaillard July21 2

In summary, strong facilitation is the key to holding successful process mapping sessions. But the real measure of success is how effectively the data captured is utilized in the overall process improvement initiative. If the identification of problems using process maps leads to lasting change that reduces costs and increases profits – you held a successful mapping session. And in that case, congratulations!

Don’t forget to leave your comments below.

Better Tools 3: Hand-drawn Process Flows in Visio

This post provides a set of shapes and a template that you can use to create process flows using a hand-drawn style.

It complements two earlier posts:

Hand-drawn Shapes

Using a ha¬¬nd-drawn style helps convey a “work-in-progress” feel that signals informality and encourages discussion.

I often use them to confirm conversations and to model early versions of simple flows aimed at a business audience. They fit between the informal stick figure approach and a formal modelling toolset like BPMN.

Here is a sample of a process modelled using the shapes and template.

coomber May26 IMG001

Most process flows can be expressed using the task and gateway shapes, with the circle shapes used for start and end. In addition, there is a wider palette of shapes that represent a reasonable subset of those used by BPMN. I have found that the shapes in this palette are readily understood by a business audience and that the remainder are too advanced for this informal style of modelling.

Here is the full range of shapes:

coomber May26 IMG002

The shapes can be used in flowcharts and other diagram types, and I have included some triangle shapes for completeness.

Shape Features

The waviness of the shapes simulates a hand-drawn look by breaking up each side into sections that randomly vary off the true straight line. In the case of the circular shapes, the outline is actually a smoothed octagon with a slight randomness built into the location of each of the vertices.

Each shape is subtly different from each other, and in rare instances, the representation can be a bit extreme. Right-clicking the shape provides an to option redraw the shape using a different random distribution.

Right clicking the shape also allows the section of variations within the main shape, for example to reveal the message icon within the start and end shape or the location of an icon on the connector.

coomber May26 IMG003

The colour of the outline is a subtle grey to simulate a pencil outline and the font is comic sans to simulate handwriting. I tend to use the dynamic connector with straight lines because I like the flexible way it handles shape moves. However, I have provided a simple straight line in hand-drawn style for those that need one.

The template provided is based on the standard Visio cross-functional template. It includes a smart audit box for name and date that keeps its position in the top right of the frame as the size of the diagram gets bigger.

Using the ShapeSheet

The ShapeSheet is a Visio function that lets you look at the internal controls that define the shape. It describes its geometry, location, size and style. To view the ShapeSheet, you will have to switch on the developer tab, and then right click on any shape.

If you look at the ShapeSheet for the task shape, you will see a user field called User.sf – the scaling factor. Altering this value changes the waviness of the shape, something you may want to do if enlarging the shape or changing the line thickness for special diagrams. You will also see the geometry that draws the collapsed and loop icons and you will be able to follow the way that Visio uses the right click function to control what parts of the shape are shown.

The circular shapes are also an interesting example of how a shape can be assembled from several components. In this case, it shows an inner circle and a picture, and how to reveal and hide each using values passed from right click feature.

The connector shapes are a good example of how to connect pictures to lines, something that isn’t that obvious.

Inspiration

I got the idea for hand-drawn shapes from The Visio Guy – a site that contains a wealth of Visio shapes, tutorials and community feedback. There, you can find further examples of hand-drawn shapes.

I learned a great deal about managing Visio shapes from this project. I hope you will enjoy using them and perhaps use them as a starting point to your own explorations.

Downloading the Tools

The tools can be downloaded from Document Productivity. At the site you’ll find free downloads for a range of other Word and Visio tools.

Don’t forget to leave your comments below.

Process Approach to Requirements Gathering

This blog was supposed to be on requirements elicitation techniques, but it ended up being an example of what peer review does. I finished my blog and handed it over to my colleague for feedback. He pointed out that I assumed people knew how to gather requirements for them to start using the techniques mentioned in the blog. In other words, the blog on techniques was a step ahead, and I should first explain the approach. Ouch! The bump on my head still hurts. So, here we go.

I interview many candidates. Whenever I ask “How do you approach requirements session?” the answers invariably include something akin to “I use JAD session” or “I shadow users”. JAD (Joint Application Design), shadowing, interviewing, and brainstorming are techniques used AFTER you have an approach. Think of it this way. You decide to go on a vacation. How do you approach it? You don’t start with “I will drive” or “I will fly”. These are ways (techniques) by which you reach the destination. The first thing you need to do is decide where to go, when to go, and how to go (approach). The series of steps you take (approach) has to precede the decision to drive or fly (technique). There is a very fine difference.

So, how do we plan an approach to a requirements gathering session? Do we call for a meeting and ask the business user “ok, so what do you want?” or “I am ready, go ahead and list your requirements?” Don’t be surprised if you get a very lengthy grocery list! To avoid such mishaps here is a process-based approach to requirements gathering.

The first point in my last blog was “Do your homework”. The first step as part of homework is to understand the organization and the unit. This understanding provides the big picture so that the goals of the requirements that are to be gathered align with the goals of the organization and unit. Next is to understand the business under consideration, and the scope of the system being worked upon. There are many avenues to it. One of them is to get hold of an AS-IS process diagram.

Start from a high-level process. Some call it “Level 0” or “L0.” Drill down from here to the lowest level possible – L1, L2, L3 and so on (do not confuse this with support levels). Normally you would achieve this by L3 or L4. If AS-IS diagrams don’t exist, your task is to create them.

A mature organization typically has all the “as is” processes documented. Go over it. Go over any other document related to the system that may be available – business bequirements focuments (BRD), functional specifications documents (FSD), user manuals, data flow diagrams (DFD), entity relationship diagrams (ERD), and DDD (sorry, I just created that one!). Get access to the test system and play around in the sandbox – see what it does, see what it doesn’t do. Talk to the technical people. Sometimes they know more about the business than the business users themselves. Ask for a walk-through by technical and/or business folks. If you have a knowledgeable lead, talk to them. By now you should have a good understanding of the way business is conducted. As you assimilate information, note things that don’t seem right. Always remember your title – Business Analyst – so make sure that you are always trying to analyze as you proceed.

Armed with enough knowledge, proceed to capture the “to be” process. Remember, you are documenting only the “to be” process and not the requirements. A common pitfall is to embed requirements in process documents. Be sure to avoid it.

Make a copy of the “as is” process and mark bottlenecks, pain points, workaround’s, manual processes, and non-value add processes. See if you can measure lead and lag times between points in the process. All the current weaknesses should be resolved in the “to be” process in addition to any new functionality or change in the process itself. Beware not to resolve a process inefficiency by automating it. You will be automating inefficiency.

Again start from Level 0 or L0. Make necessary changes. Each of the tasks define your high-level requirements. Here is an example of a L0 procurement process in a bureaucratic organizationRamasarma May5 IMG001

Use the gathered requirements to prepare your high-level BRD.

Each of the boxes can further be broken down into next level processes. For example, the first task can be decomposed intoRamasarma May5 IMG002

Again, each of the tasks can further be elaborated (here is a buzzword for the interviews – Functional Decomposition). Here is what it may look like, assuming that we go all the way to the lowest level possible (do not magnify the picture. It is there for illustrative purpose only):

Ramasarma May5 IMG003At each level look for opportunities to eliminate both the deficiencies (what is missing) and the inefficiencies (what isn’t needed) in the current process. Keep this maxim in mind while redesigning processes – the shortest distance between two points is a straight line. A straight line is not always practical or feasible, but use it as a guideline to streamline the processes. Even if you manage to eliminate or refine one or two steps, it can result in significant time and cost savings.

The hazy little light blue rectangles in the diagram above specify the system that performs that particular task. The diagram also includes manual tasks, reports, and emails. Check if you can automate manual tasks, and whether consecutive manual tasks can be replaced by a workflow. Again, do not automate inefficient processes. Deal with reports separately. Once the “to be” process is documented, have it validated by the business users. Validation is mandatory. It is so mandatory that I will say it again – it is mandatory to have these “to be” processes validated and approved by the business users. What you are left with is a bunch of tasks at the lowest functional level. It is for these that you need to gather functional requirements.

There is one more step you need to do before diving into the requirements gathering process – organize a requirements elicitation kick-off session. Invite business users and the technical team members. Highlight the importance of requirements, characteristics of a good requirement, what has been achieved so far, next steps, and the need for continued user participation and cooperation. The most important component is listing and explaining a good requirement. What are the characteristics? Here is a website that explains it really well. (The next blog will address this and requirements gathering techniques). There are some good examples on the website of how not to write a requirement, which is equal in importance to how it shall be written (a touch of BA humor there!).

The following diagram summarizes the approachRamasarma May5 IMG004

We are ready to launch into the requirements gathering process. That bump on my head is now better.

Don’t forget to leave your comments below.

The Four Agreements You Need to Have a Successful Process Mapping Session

Process mapping is a group exercise in which teams of subject matter experts (SMEs) and/or process owners (POs) gather to determine how work gets done. Step-by-step diagrams are drawn to document the who, what, when and how a business task is performed. Teams utilize process mapping as a way of finding opportunities for improvement, increasing transparency between groups, and understanding the roles of systems in processes.

The results of process mapping can inform strategic plans and change the course of an entire organization. However, to yield those results facilitators must first learn to establish rapport with teams and make four critical agreements to ensure success. Process mapping sessions without these agreements almost always yields poor results leaving participants weary of the value of the exercise. These four agreements will help to ensure that your efforts will not be in vain.

1. Believe That Change Is Necessary – Process mapping teams must believe that there is a need for change in order to gain commitment and rally support for holding a mapping session. If there is no support for change, it will be very difficult to convince SMEs to spend time documenting their work – publicly.
Business improvement projects often require making a case for change to win cross-functional support. You will need to do the same for launching a cross-functional process mapping session to ensure effective participation from SMEs, eliminate suspicion, and create interest and advocacy for the effort. Here are some recommendations for making a strong case for change:

  • State the problem/suspicion and how it’s connected across organizations
  • Demonstrate urgency with preliminary data and metrics
  • State the potential consequences for not investigating problems

The case for change must be shared with SMEs and all interested parties to win continued support for the effort.

2. Be Transparent, Engaged and Committed – Gathering SMEs for participation in the mapping session may require a significant amount of time and commitment. You will be asking co-workers and/or teams to take time out of their busy schedules to identify exactly what they do, how they do it and take responsibility for whatever is revealed.

This request can be met with either a readiness for change or fear that potential improvements could leave job roles vulnerable. Without open and honest communications you will most likely face resistance from those who fear change and at best obtain an intermittent level of participation from your SMEs.
Being transparent about the need for change and establishing upfront the level of commitment and engagement required will help to ease those concerns. Follow these four steps to win over SMEs:

  1. Conduct an information session to present the case for change and explain how the mapping process works.
  2. Discuss the amount of time that will be needed to document and create the process maps.
  3. Negotiate the best times for the mapping session with participants so that they will be better able to manage competing priorities and be fully engaged.
  4. Agree that data and findings are to be used as a tool for discussion and improvement rather than as a weapon to point fingers and place blame.

3. Make Sure Everyone Has A Voice – Bringing the right people to the table and allowing those people to be heard are critical to ensuring that a complete and accurate process is documented. We can often figure out at a high-level the departments or groups that are involved in a process, however, we don’t always know the details of how a process works and/or what person, group or team may be involved. Identifying SMEs to invite to a process mapping session can be ambiguous, however, using the SIPOC tool from the Six Sigma discipline can help shed some light.

SIPOC is an acronym for Supplier, Input, Process, Output and Customer. It can be seen as a high-level process map that is typically used to understand the purpose and scope of a process prior to the launch of a process improvement project. It is also an excellent way to identify key players for the mapping session. Brainstorm with a small team and complete the SIPOC by asking questions about each of the acronyms and answering them. See Table 1 as an example.

Table 1 – SIPOC for Contract Pricing Verification

galliard March27

Note: External suppliers and customers are not required participants in the typical process mapping session. Often the goal is to document internal processes. However, in order to understand the role and activities of the external supplier and customer, liaisons are often invited to the mapping session where they will be able to provide input and share outcomes in support of necessary changes.

Based on the results of the Contract Pricing Verification SIPOC provided in Table 1 we learn which internal suppliers and customers are imperative to invite as key participants. We also identified stakeholders who may be able to provide additional insight into the process. Overall, you will be able to assemble a good team that will provide a good 360 degree view of the process.

4. Put Your Name On It – SMEs and/or POs must validate the process maps to prove that each participant was present, engaged, and stands behind their contributions. Validation confirms that the process maps are accurate and represent the current or desired future state process. Process maps without this validation hold little weight and leaders may be hesitant to rely on them for decision making in process improvement initiatives.

Obtain a sign-off from each SME and/or PO during the review process by asking them to send an email or electronic signature confirmation that they have read the maps and that their roles and activities are accurately depicted.

In summary, the results of an effective process mapping session can be rewarding and uncover unnecessary waste that can lead to great efficiency across your organization. Obtaining these four agreements prior to the launch of a process mapping session will help to ensure that you realize the benefits from the exercise. Happy mapping!

Don’t forget to leave your comments below.

Process Patterns – Applying Method to Chaos

Unpredictability. Randomness. Chaos.

They are the only certainty in the life of any Business Analyst. Even more so for the brave ones painting green-field processes for a large enterprise project.

Throwing up our hands in despair is not a choice. And making costly changes to a program of work midstream will not endear us with the Project Managers ( and that’s putting it mildly).

I was faced with such a challenge in the last year working as a Lead Business Analyst for a major program of work. Process patterns came to my rescue.

Patterns in real life

Humans are intuitively programmed to bring structure around us. Every successful civilization has worked on making society predictable. Our approach to science has been no different from life. We are governed by patterns — climate, seasons, diurnal dance of the planets in the solar system, etc. Where they do not exist we invent one — transport, communication, weekends, etc.

Astronomers see patterns in the random sprinkling of stars in the sky. Mathematicians look for fractal patterns even in the most chaotic distribution. Bio-technologists search for patterns in DNA. Climatologists study weather patterns to predict global warming effects. Every field involved in handling complex systems deploys the use of patterns to analyse and simplify. 

Alex Bellos, in his fascinating book Alex’s Adventures in Numberland, talks of intricate design patterns in the mosque as a way of finding God through patterns.

Patterns in IT world

Patterns occur in everything.

Design patterns are a very common methodology in developing IT systems. Creational, Behavioural and Structural patterns are quite common thought processes used by Developers.

Data mining is deployed to understand information, correlate and study the behaviour of discrete data points. Statistical tools are very common to understand variance, randomness and distribution.

Interaction pattern is the development of a framework to model inter-organization interactions (can be used for intra-organizational too) to predict the exchange of information. Request, Acknowledge, Respond is such a pattern that could be deployed between a Customer and Supplier framework for interactions.

Process patterns is the emergent ability to define fragments that will provide a reliable mechanism for handling random events in a complex system.

Process Patterns

In the program of work I was involved in, I established the Happy Day Scenario using Level 4 processes at an activity level. Process patterns were then used to decompose individual Level 4 activity into Level 5 processes at the task level.

Embracing Murphy’s law, we soon firmed up that anything that can go wrong will go wrong. Data may be missing or inaccurate. System integration can break. People can make mistakes. Hence scenarios were soon approaching quite a large number. Defining a Level 5 Task process for each Scenario would have been a hopeless exercise. And we would have missed the forest for the trees. This is the key distinction for mapping patterns between Scenario-driven and Pattern-Driven.

The answer I felt was in the identification of the pattern in the process. For instance, a set of tasks could lead to the happy-day outcome. What would happen if things go wrong? We established a pattern for exception as follows:

  1. Resolve the exception using the system as part of the activity (Automatic resolution pattern; e.g., Re-try transaction)
  2. Resolve the exception manually as part of the activity (Manual resolution pattern; e.g., Fix data issue and re-try task)
  3. Resolve the exception and re-enter the activity (Activity Re-entry pattern; E.g., Fix issue and re-enter from the first task in the activity)
  4. Resolve the exception and re-enter from the previous activity (Process Re-entry pattern; e.g., Fix issue and re-enter process from an earlier activity)
  5. Resolve the exception by abandoning the process (Process Abandonment pattern; E.g., Cancel Order and re-commence)

Similarly, patterns were established for workflows, sub-processes, alternate flows and product types.

It was a fun exercise to map these patterns and ask our business stakeholders to challenge with scenarios. We were lucky to have a lot of black-hat thinkers who could come up with What-if situations based on data, systems or people exceptions and test the process pattern. The use of the right combination of process patterns stood the test in most cases.

Process Pattern led Design

Advantages of the process patterns were it fostered the need to design based on patterns. So the thinking is percolating to the way systems are developed. Further testing is simplified by testing the core patterns. Since we ended up with close to 100 process patterns (yes, it was a complex program), testing was prioritized for the critical patterns and scenarios chosen to ensure each pattern worked.
Process patterns provided us with some level of insulation from changes that are constantly happening in our business landscape. The introduction of new products, contracts or customer interactions have largely been channelled through existing process patterns.

And to quote Richard Bach below, the recognition of process patterns can help us see new horizons.

A cloud does not know why it moves in just such a direction and at such a speed…It feels an impulsion…this is the place to go now. But the sky knows the reasons and the patterns behind all clouds, and you will know, too, when you lift yourself high enough to see beyond horizons.”
– Richard Bach, Author of Jonathan Livingston Seagull

Don’t forget to leave your comments below.